
Sunday, November 22, 2009
Wednesday, September 9, 2009
tracing outlines in Illustrator
To trace the outlines of a photo in Illustrator.....
Go to stevecampbellhillwoodsamples.blogspot.com
You will be working with two documents. One is a Photoshop document and the other is an Illustrator document.
1. Find a simple photograph that is high resolution. Try caedes.net for photos. It would not be a bad idea to place this photo in the new Photoshop document. The resolution of the Photoshop document should be 300 ppi.
2. Open Illustrator & create a new Illustrator document.
3. Copy & paste the photo into the new Illustrator document.
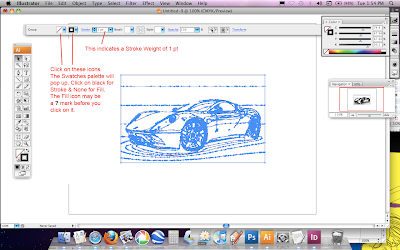
Items 4 - 12 are illustrated with the images below.
4. Go to Object>Rasterize in the Illustrator menu. At the Rasterize menu, select Color Model: CMYK, Resolution: High (300 ppi), Background: White.
5. Go to Live Trace>Tracing Presets & Options menu.
6. Go to Tracing Options….
7. At this menu, be sure Mode is Color
8. Set Max Colors to 6 - 10. The lower the Max Colors value, the simpler the tracing and the fewer the number of areas created. You could raise Max colors to 25 - 30, and raise the Minimum Area value to 100. You can experiment here.
9. Check preview. You will see blue outlines.
10. Click Trace.
11. On the Control panel, click Expand.
12. On the Control panel, click on the ? mark and choose a fill of None. Then choose a stroke Weight of .5 (or more).
13. Copy and paste this into Photoshop.
14. Go to Layer>Rasterize>Smart Object
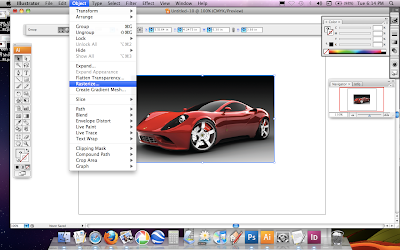
5
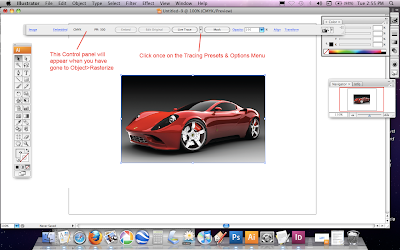
6
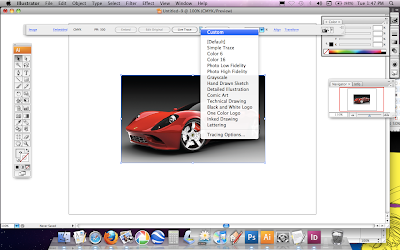
7-10
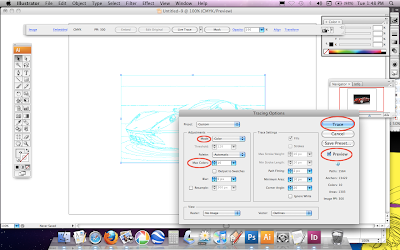
11-12
Monday, August 24, 2009
how to download and install brushes in photoshop
typing on a circle in illustrator
It's easy to add text to a circle in Illustrator. You just draw a circle, choose the Path Text Tool, click the circle and type. The tricky (and infuriating) part comes when you want to add two different phrases and have one right side up at the top of the circle and one right side up at the bottom of the circle. Here's the trick!
Draw a circle with the ellipse tool by holding down the shift key as you draw. It really doesn't matter what color the stroke or fill are because as soon as you click with the text tool, fill and stroke both disappear.
Choose the Path Text Tool on the text tool fly out.
In the paragraph palette (Window > Type > Paragraph) set the justification to center and click on the bottom center of the circle. This will center the type cursor at the top of the circle when you type.
Choose a font and size and enter the text for the top of the circle.
Select the circle with the selection tool. Cmd/ctrl + C or Edit > Copy to copy it to the clipboard, then cmd/ctrl + F or Edit > Copy in Front to paste in front so a new copy goes directly in front of the old one. It will look the same (except the text appears heavier) since the new one is pasted on top of the original.
Go to Type > Type on a Path > Type on a Path Options. Choose Rainbow for the Effect, and for Align to Path, choose Ascender. The Ascender is the highest part of the lettering and will place the text outside the circle. Check the Flip box, and check Preview so you can see how it will look. Spacing can also be adjusted here. Click OK.
Click and drag over the text to highlight it, and in the Character Palette, change the font and size.
Click away from the text to deselect it and choose the Selection Tool in the toolbox. Notice the handle sticking up from the center of the text? With the selection tool (V), click and drag the text to the bottom of the circle. Caution! Be careful not to drag upward or the text will flip to the inside of the circle. This is tricky!
Drag a relevant symbol from the symbols palette, and drag to resize it to fit the circle, and you're done. (If you have more time, you can draw your own logo art.) There you have it! A quick and easy logo with text on the top and bottom of a circle!
Here is the link for this explanation:
http://graphicssoft.about.com/od/illustrator/ss/typeonapath.htm